Publish a Local Webserver
Diode is the Swiss army knife of Web3 capabilities! One of the neat things it allows you to do is to publish a local website / webserver to the Internet where anyone can view it.
A common reason for doing this is to allow others to see a website that is under development - the development is done locally and can be viewed by collaborators remotely without setting up a staging server and without any IT tools / configuration. It is much easier and faster to just use Diode to publish your development website so that you can get others’ feedback.
Using this method, you could also host a website long term without requiring a server, static IP address, or ICANN-registered domain name.
Have fun with this, and let use know in our Telegram channel if you have any feature requests!
#Publish a Local Website
If you already have a website running on port 80 of localhost, install Diode and simply run:
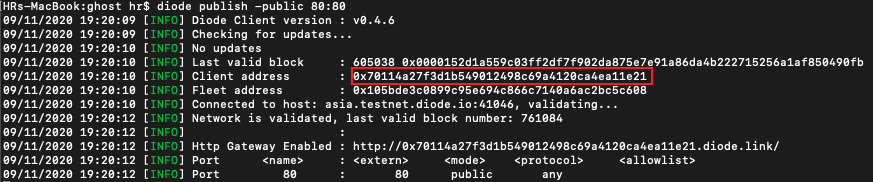
diode publish -public 80:80
This publishes whatever you see at http://localhost:80 to the Diode Network at <client_address>:80. It is accessible on the Internet at https://<client_address>.diode.link.
If you don’t have a webserver already running, checkout the Diode CLI’s built-in webserver!
The <client_address> can be found in the terminal output, as shown boxed in red below, when the command is ran. The line “Http Gateway Enabled” shows the full external URL - in the case shown below, it is http://0x70114a27f3d1b549012498c69a4120ca4ea11e21.diode.link/ You can use that URL to share your website with others.
If you don’t yet have a web server, Ghost is a good option - see the article about running Ghost on a Raspberry Pi.
If you are running a service on another port, for example localhost port 2368 (or - Elixir dev server usually uses port 4000, node typically uses port 3000), you can publish it to public port 80 with:
diode publish -public 2368:80
You can also publish on multiple different ports. For example if you want to show two differents sites, or publish a main site and a hidden admin area. For this the HTTP gateway supports the additional port ranges 8000-8100 and 8400-8500. This is an example publishing port 80 to https://<client>.diode.link and port 2368 to https://<client.diode.link:8025
diode publish -public 80:80,2368:8025
#Configure a “Domain Name” with the Diode Blockchain Name System (BNS)
In the example above, the URL starts with your globally unique static Client address - a boring sequence of numbers and letters: http://0x70114a27f3d1b549012498c69a4120ca4ea11e21.diode.link/If you want to customize the name, you need to setup a BNS name to map to your address.
There are two ways to do this:
- Configure MetaMask and use the Diode Network Explorer (docs) to reserve a BNS name and link it to your Client address
- Use the Diode Client itself to reserve and link:
diode bns -register my-example-name
IMPORTANT NOTE: Using the Diode Client to register the BNS name binds the the name to your Client’s local wallet. Ensure you keep a backup of your wallet file at ~/.config/diode/private.db so you won’t lose access to the domain! If you want one location to manage all your BNS names, use the Diode Network Explorer method (you can use a MetaMask wallet, or hardware wallet, to manage all your BNS names). That allows you to, for example, easily link the BNS name to a different Client address.
Once you’ve created your BNS name and linked it to your Client address, your website will now be available at https://my-example-name.diode.link. Note that you may need to wait a few minutes for the BNS name to be trusted by the network.
#Publish the Website Securely
If you’d only like certain individuals to access your website, you can use the publish option -privateto publish it so that only a single specified Diode address can access it, or the option -protected so that only Diode addresses listed in the same Fleet Contract can access it. For example:
diode publish -private 80:80,<authorized_address>
Run diode publish --help for more information.
When using these modes, each viewer must also be running the Diode Client as a local gateway so as to authenticate themselves with the Diode Network.
#Other Articles
Setup a custom domain name (web2 TLD)
Use the Diode CLI to publish static content (no other webserver required)